

A custom domain is a unique branded name that identifies a website. For example, MeroBloggingTips’s custom domain is merobloggingtips.com. Custom domain, also known as vanity URLs, appear in the address bar at the top of every browser.
Use a custom domain for your blogger site
You can use a custom domain for a blogger site published on new Google blogger Sites. Using a custom domain can make it easier for people to find and remember your site with a web address like www.merobloggingtips.com.
To use a custom domain for your site, you can:
use a domain you own that is registered.
Important: Only the owner of a site can connect blogger sites to a domain. Learn more about how to verify the site ownership.
{tocmero} $title={Table of Contents}
Set up custom domain you own that is registered elsewhere
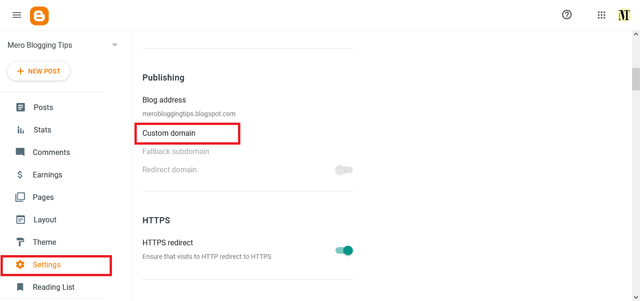
- Go to blogger dashboard draft.blogger.com
- Go to Setting » Publish
- Click Custom domain.
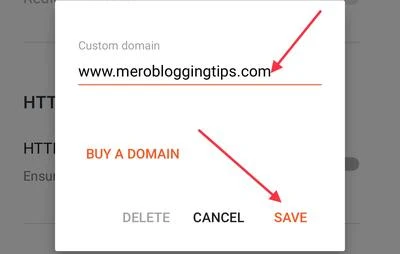
- Enter your domain name.
- Click SAVE.
Follow the on-screen instructions to connect to a third-party domain registrar.
- These steps may be different depending on your registrar. For more help, go to your domain registrar’s help resources.
-
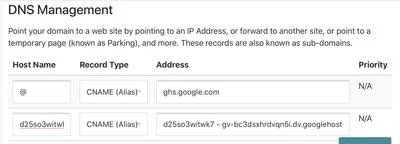
CNAME, or Canonical Name, is an entry within the Domain Name System (DNS) that specifies where someone can find your web pages. You'll use the CNAME to associate your custom domain with your blog.
First, you'll need a corresponding CNAME record for the blog address you selected that's associated with ghs.google.com. For example, if you selected yourdomainname.com, you will associate your naked domain blog with ghs.google.com. You can redirect your nacked domain yourdomainname.com to www.yourdomainname.com adding the Name Value:www Record Type: CNAME Destination(Address) Value:ghs.google.com.
Second, you need a second security CNAME record. When you try to save your domain in Blogger, the system should fail and display two security tokens. You'll need to create a second CNAME record to associate the short token {example (Name: hqzzzn56a3ri)} to the long token {example (Destination: gv-oc7x5vzzzqxirt.dv.googlehosted.com)}.
Properly ADD two CNAME Records as following table and picture below within the Domain Name System (DNS) of your domain's DNS Management System.
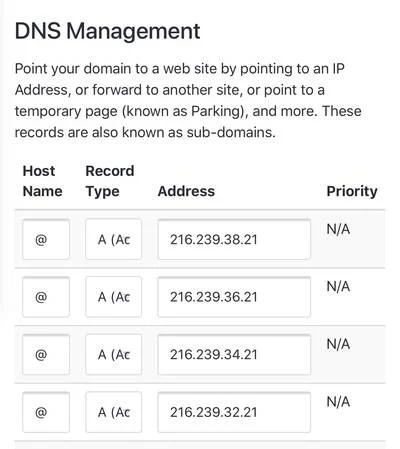
- Blogger suggest to add these four IPv4 address as A-records. With naked domain in the name field and IPv4 as destination. The ip addresses are:
- Go back to blogger dashboard draft.blogger.com then, Go to Setting » Publish » Click Custom domain. Enter your domain name. Click SAVE.

| Host Name | Record Type | Address Value (Destination) |
|---|---|---|
| www | CNAME | ghs.google.com |
| hqzzzn56a3ri | CNAME | gv-oc7x5vzzzqxirt.dv.googlehosted.com |
| Host Name | Record Type | Address Value (Destination) |
|---|---|---|
| @ | A | 216.239.32.21 |
| @ | A | 216.239.34.21 |
| @ | A | 216.239.36.21 |
| @ | A | 216.239.38.21 |
If you can't save your domain to your blogger blog verify ownership of domain adding Text Record within the Domain Name System (DNS) of your domain's DNS Management System., skip the remaining steps in this section and follow the instructions later in this page. Then try again.
Verify ownership of your domain with TEXT Record
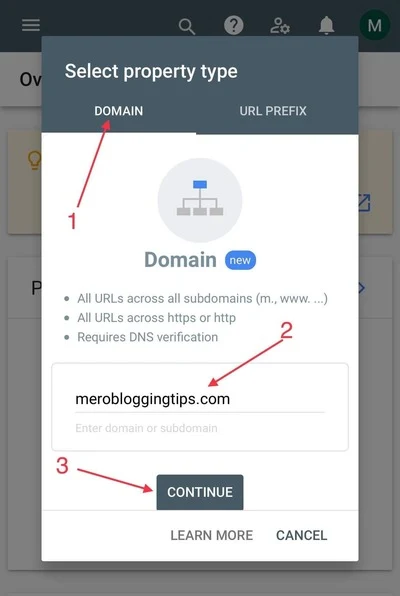
- Go to Google Search Console and Login with your gmail account.
- In the navigation pane, choose Add property or Search property.
- Click Add property.
- In the Domain (not URL prefix) option, enter the domain you want to verify. For example, mydomain.com.
- Click Continue.
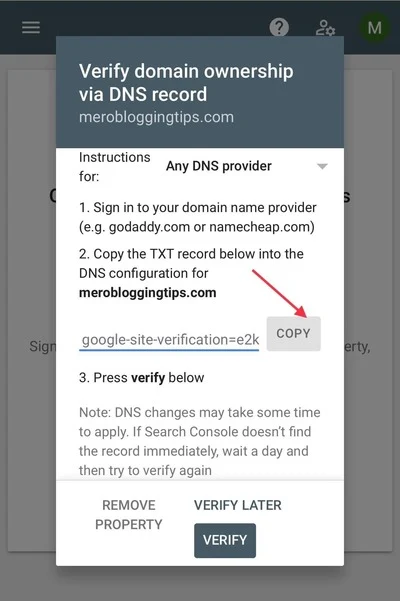
- Follow the instructions for "Any DNS Provider."
- Copy the TXT record that Google Search Console provides and add it to your DNS records.
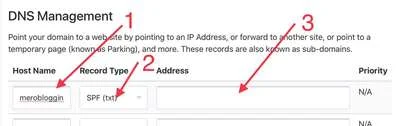
When you add a TXT record values to your domain's DNS settings, you enter specific values depending on what you're using the TXT record for. Below are the values to use when configuring TXT records for various uses with Google services.
You enter these values at your domain host, not in your Google Admin console. Note also that some hosts use different labels for the name and value fields.
Note: Time to Live (TTL) is the number of seconds before subsequent changes to the TXT record go into effect. This value is 3600 for all TXT records.
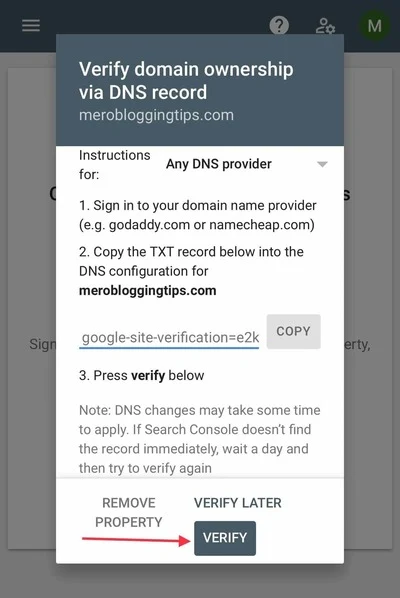
- After you’ve added the TXT record to your DNS records, click Verify.
- After verify your domain, Go back to blogger dashboard draft.blogger.com then, Go to Setting » Publish » Click Custom domain. Enter your domain name. Click SAVE.
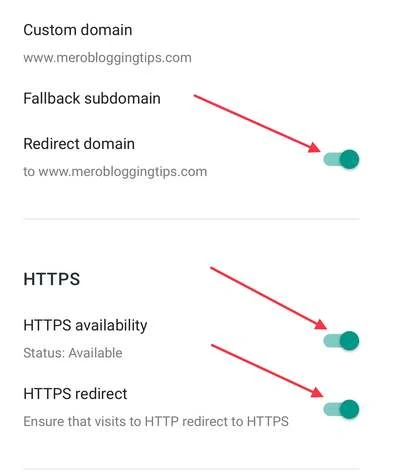
- After saving custom domain Redirect your nacked domain (yourdomainname.com) to www.yourdomainname.com then, enable Hypertext Transfer Protocol Secure (https).
Congratulations! Now You are on Blogger with your custom domain connected with Blogger.