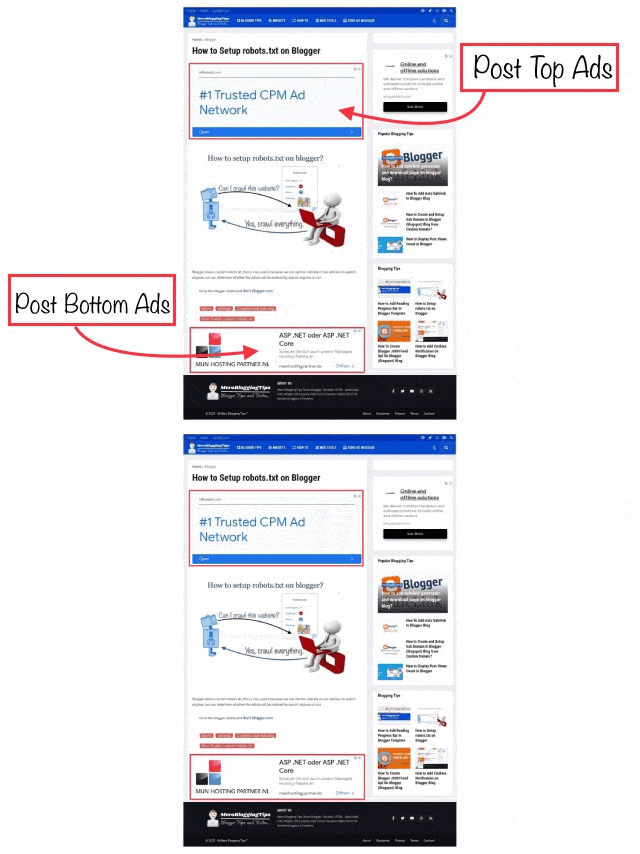
One of the best places where you can add Google AdSense ads on your Blogger blog is header of the post and footer of the post on your Blogger. This will make ads appear above the fold area so that the user will be able to see them without scrolling down.
Placing Google AdSense ads header of the post and footer of the post will also help you to generate more revenue from your Blogger blog as it will increase the click-through rate (CTR) and cost per click (CPC) of the ads.
In order to get good CTR, you need to place ads in the right place, the most visible and eye catchy spots in a blog are header and footer of the post. I have seen rapid increase in the CTR, when the ads were placed in top of the page just below the post title and below of the post.
This tutorial will guide you how to place Google AdSense ads below of the post title (header of the post) and footer of the post (below of the post) on your Blogger blog. let’s first discuss which ad units are most suitable to be used in this place.
Which ad sizes suitable for header and footer of the post?
There are various ad sizes available in Google AdSense. Here we have discussed which ad sizes you can place ads top of the post and below of the post on your Blogger blog –
- Responsive ads – We recommend you to use responsive ads top of the post and below of the post as they will automatically adjust their size, appearance, and format to fit available ad spaces. Moreover, you can customize the size of responsive ads using CSS.
- 728×90 ads – 728×90 (also known as leaderboard) ad size will also perform very well top of the post and below of the post on Blogger blog. As this ad size has a small height (90px), so it won’t take much space above the fold area.
- 300×250 or 360×280 ads – You can also use 300×250 (known as medium rectangle) or 336×280 (known as large rectangle) ad sizes top of the post and below of the post. However, these ad sizes aren’t good for desktop as they won’t fill all the available space.
Once you have selected the ad size as per your needs, go and create a new ad unit in AdSense. Simply,
- login to your AdSense dashboard
- click Ads » By Ad Unit.
- Create new ad unit choose your ad format and create.
- Now give it any name and select the ad size. After this, tap the Save and get code” button and then copy the generated ad code and save it somewhere.
Add AdSense ads top of the post bottom of the post in Blogger.
This step-by-step guide will show you how to add AdSense ads in header of the post and below of the post on your Blogger blog.
- Login to your Blogger Dashboard.
- go to Template » Edit HTML.
- Click anywhere in the template editor and press CTRL+F keyboard shortcut key to open the search box.
- Search ]]></b:skin>. copy the following CSS code and paste just above ]]></b:skin>.
- Now search the following piece of code in the template: <data:post.body/> Just replace, the following code insted of <data:post.body/>.
- Now search </main> and copy the following xml code and jaste just above the </main>
- Make sure to replace <!-- your ads code here --> with the AdSense ad code that you have generated. or
- If you want to add your adsense code automatically you don't need to generate your google adsense ad code manually, you can use the following adsense code insted of generated <!-- your ads code here -->. Replace line ca-pub-1234567890 with your google adsense publisher id.
- Copy the below javascript code then search </body> and paste javascript code jist before </body>.
- Finally, tap the "Save theme" button to save the changes. That’s it.
#custom-ads{position:relative;float:left;width:100%;opacity:0;visibility:hidden;padding:0;margin:0;border:0}
#before-ad,#after-ad{float:left;width:100%;margin:0}
#before-ad .widget > .widget-title,#after-ad .widget > .widget-title{display:none!important}
#before-ad .widget > .widget-title > .title,#after-ad .widget > .widget-title > .title{font-size:10px;color:var(--meta-color);font-weight:400;text-align:center;line-height:1;margin:0 0 8px}
#before-ad .widget,#after-ad .widget{width:100%;margin:0 0 20px}
#after-ad .widget{margin:20px 0 0}
#before-ad .widget-content,#after-ad .widget-content{text-align:center;items-align:center;position:relative;width:100%}<div id='before-ad'/>
<data:post.body/>
<div id='after-ad'/>
      <b:tag cond='data:view.isLayoutMode or data:view.isPost' id='custom-ads' name='div'>
  <b:section cond='data:view.isPost' id='merobloggingtips-before-ad' maxwidgets='1' name='Post ADS Top' showaddelement='yes'>
    <b:widget id='HTML88' locked='true' title='Ads - Top of the Post' type='HTML' visible='true'>
      <b:widget-settings>
        <b:widget-setting name='content'><![CDATA[<!-- your ads code here -->]]></b:widget-setting>
        </b:widget-settings>
        <b:includable id='main'>
      <b:include name='html-content'/>
    </b:includable>
    </b:widget>
  </b:section>

  <b:section cond='data:view.isPost' id='merobloggingtips-after-ad' maxwidgets='1' name='Post ADS Bottom' showaddelement='yes'>
    <b:widget id='HTML99' locked='true' title='Ads - Bottom of the Post' type='HTML' visible='true'>
      <b:widget-settings>
        <b:widget-setting name='content'><![CDATA[<!-- your ads code here -->]]></b:widget-setting>
        </b:widget-settings>
        <b:includable id='main'>
      <b:include name='html-content'/>
    </b:includable>
    </b:widget>
  </b:section>                                                                                             </b:tag>
<script async src="https://pagead2.googlesyndication.com/pagead/js/adsbygoogle.js?client=ca-pub-1234567890" crossorigin="anonymous"/>
<ins class='adsbygoogle' data-ad-format='auto' data-full-width-responsive='true' expr:data-ad-client='data:adClientId ?:data:blog.adsenseClientId' expr:data-ad-host='data:blog.adsenseHostId' expr:data-analytics-uacct='data:blog.analyticsAccount Number' expr:style='data:style ?: " display:block;"' style='display:block'></ins><script>(adsbygoogle = window.adsbygoogle || []).push({});</script>$("#merobloggingtips-before-ad .widget").each(function () {
var e = $(this);
e.length && e.appendTo($("#before-ad"))
}), $("#merobloggingtips-after-ad .widget").each(function () {
var e = $(this);
e.length && e.appendTo($("#after-ad"))
});Now go to your blog and check. The ads are working or not. We hope you find this guide helpful to add Google AdSense ads top of the post and below of the post on Blogger.
